Replacing the tail lighting fixtures to your classic 1992 Corvette can dramatically beautify its appearance and protection. Many owners improve to LED tail lights to enjoy brighter illumination and longer lifespan, but putting in them efficaciously often requires addressing a common trouble: the load resistor. Without one, your Corvette might experience hyper-flashing or dashboard mistakes due to the fact LEDs draw less electricity than the authentic halogen bulbs. In this complete manual on 1992 Corvette tail mild elimination for LED load resistor, we’ll stroll via the entire system of accurately getting rid of the inventory tail lights, expertise the position of load resistors, and putting in the whole thing well for a smooth improve. Whether you’re doing this to boost fashion or improve functionality, following those steps will assist you improve like a pro.
Understanding LED Tail Lights and Load Resistors
LED lighting are a current solution for boosting visibility and aesthetics in older motors just like the 1992 Corvette. However, on account that they use much much less electric present day than traditional bulbs, your car’s onboard systems may interpret this as a bulb failure. This is where load resistors come into play. These small additives are wired in parallel to imitate the electrical load of a regular bulb, stopping hyper-flash and making sure your flip signals and brake lighting feature as supposed. Removing the unique tail lighting and preparing for LED installation requires careful handling and understanding of wherein to insert the load resistors. Taking your time for the duration of the tail mild elimination technique is vital to keep away from detrimental wiring or mounting clips.
Tools Needed for the Tail Light Removal Process
Before diving into the real manner, collect all of the vital tools to make the elimination and set up manner green. For your 1992 Corvette tail light elimination for LED load resistor, the proper equipment will prevent unnecessary pressure at the car’s growing older plastic components and make certain a easy swap. A simple set of screwdrivers (Phillips and flathead), socket wrenches, pliers, electric tape, cord strippers, a multimeter, and a set of LED-well matched load resistors should be on hand. These equipment no longer most effective simplify the removal system however are important in securely attaching the resistor to the auto’s electric device with out inflicting shorts or free connections. Don’t neglect safety gear like gloves and safety glasses to avoid harm while handling equipment or sharp edges across the tail mild housing.
Step-by-Step: 1992 Corvette Tail Light Removal Process
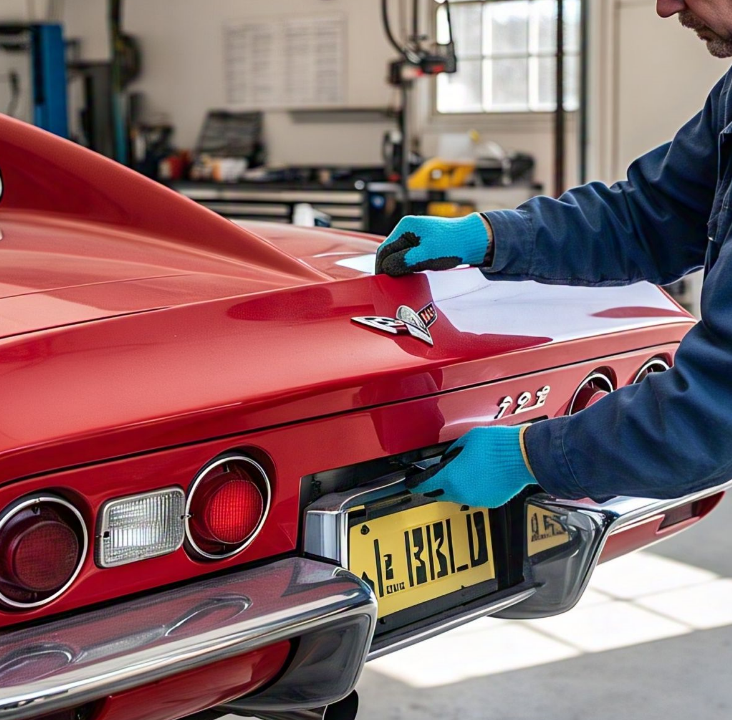
To start the tail mild elimination, open your Corvette’s rear hatch or trunk and discover the indoors get admission to panel behind the tail lighting fixtures. Remove this panel the use of a flathead screwdriver or trim tool. Once the panel is off, you will see the back of the tail mild housing and the wiring harness. Unscrew the maintaining bolts using a socket wrench and gently pull the tail light housing out of the automobile. Be cautious, as the connectors may additionally nonetheless be connected. Unplug the wiring harness with the aid of pressing the discharge tab and pulling it immediately out. Keep the bolts in a safe region for reinstallation. This step is essential for making ready the set up of each the new LED tail lighting fixtures and the accompanying load resistors.
Installing the LED Tail Lights Correctly
Once the unique tail lighting are eliminated, it’s time to put together the LED replacements. Most aftermarket LED tail lights are plug-and-play, however you’ll want to attach a load resistor to avoid electric problems. Start by means of figuring out the ideal wires: generally, the ground, brake/turn signal, and tail mild wires. Use your multimeter to affirm their function in case you’re uncertain. Strip a small part of insulation from the brake/turn signal and ground wires, and fasten the burden resistor in parallel. Secure the connections with twine connectors or soldering, then wrap with electric tape or use heat shrink tubing for insulation. Test the new LEDs before securing them completely. If they mild up properly without hyper-flashing or errors codes, continue to mount the tail lights into the unique housing and tighten the bolts securely.
Where to Mount the Load Resistor Safely
One of the most crucial concerns while putting in a 1992 Corvette tail light elimination for LED load resistor setup is where to location the resistor. Load resistors get hot, so it is essential to mount them on a metallic surface far from plastic or flammable substances. A precise spot is the metal frame close to the tail light area, where airflow can cool the resistor. Use zip ties, screws, or metallic brackets to hold the resistor firmly in area. Some LED resistor kits include heat-resistant adhesive backing, however the usage of a mechanical mount is extra steady and durable. Avoid placing resistors inside enclosed booths except you upload ventilation. Correct placement not handiest protects your Corvette but additionally ensures the LED tail light improve lasts longer.
Testing for Hyper-Flash and Error Codes
Once you’ve got hooked up the brand new LEDs and resistors, it’s time to check the machine. Start your Corvette and set off the tail lighting, brake lights, and flip signals separately. Observe whether or not the lighting fixtures light up properly and whether the flip alerts blink at a normal velocity. If you still enjoy hyper-flashing or a sprint caution, recheck the resistor connections. Ensure the resistor is wired in parallel and now not in collection, and that the wiring insulation is unbroken. Use a multimeter to check for continuity and voltage drop across the circuit. Many times, simple troubles like a loose connector or weak ground can reason malfunctions. Taking the time to double-test the entirety earlier than finalizing the set up will keep future headaches.
Preventing Damage During Tail Light Removal

Removing the authentic tail lighting from a 1992 Corvette requires endurance, particularly for the reason that the car is over three a long time antique. The plastic clips and housing would possibly have end up brittle, and forcing components out can motive cracks or damaged tabs. To prevent damage, always use a gentle pulling movement and avoid prying too aggressively. Spray a small quantity of lubricant across the mounting place if vital. Keep in mind that replacements for traditional Corvette tail mild parts may be highly-priced or difficult to supply. If any clips or seals appear broken, update them at once to make certain the new LED setup remains watertight and securely set up. Preserving the integrity of the housing throughout 1992 Corvette tail mild removal for LED load resistor installation is simply as critical as wiring effectively.
Tips to Choose the Right Load Resistor
Not all load resistors are created equal, so deciding on the appropriate one is crucial to your Corvette’s lights system to operate efficaciously. For a 1992 Corvette, you’ll commonly want a 6-ohm, 50-watt resistor for each LED bulb that replaces an incandescent one. Confirm the specifications in your LED tail light kit, and keep away from resistors that appear too lightweight or cheap, as they’ll fail upfront. Look for resistors that include heat-resistant casings and mounting brackets. Also, ensure the resistor is CAN-bus well suited in case your Corvette’s device requires it. Investing in a excellent load resistor package ensures a secure and lengthy-lasting conversion process, and helps avoid capacity electrical problems down the line.
Long-Term Maintenance After LED Upgrade
Once you have effectively finished the 1992 Corvette tail light elimination for LED load resistor manner, ongoing preservation is extraordinarily simple however nonetheless vital. Periodically look at the resistor mounting place to ensure it’s still steady and unfastened from corrosion. Check the wiring insulation for signs of wear and tear, specially if uncovered to warmness or moisture. LED tail lighting fixtures commonly closing plenty longer than conventional bulbs, however it’s still sensible to check them month-to-month to make sure all lights feature effectively. Also, clean the lens covers frequently to hold maximum brightness and visibility. Keeping an eye fixed on those small preservation obligations ensures your lighting system maintains to carry out reliably and continues your 1992 Corvette searching sharp on the street.
✅ Quick Bullet Points Summary
- Always disconnect the battery before starting tail light removal.
- Use a multimeter to confirm correct wiring before connecting resistors.
- Mount resistors on metal surfaces to prevent overheating damage.
- Test all lights thoroughly before securing everything back in place.
- Replace any damaged clips or gaskets during reinstallation.
🔚 Conclusion: A Bright Upgrade for a Classic Corvette
Upgrading your 1992 Corvette’s tail lights to LED is a smart choice that enhances both look and capability. However, the procedure needs attention to element—specifically whilst installing load resistors to ensure proper electric operation. From cautiously disposing of the authentic tail lights to safely mounting the burden resistor and trying out your new setup, every step is vital. With the right tools and statistics, you may optimistically address the 1992 Corvette tail mild elimination for LED load resistor task and revel in cutting-edge lights performance in your classic ride. This improve now not handiest provides a graceful, current look on your Corvette however additionally improves protection and longevity, providing you with self assurance on the road.
❓ Frequently Asked Questions (FAQs)
Q1: Why do I need a load resistor for LED tail lights?
LED bulbs use less power than incandescent bulbs, which can cause hyper-flashing or dashboard error messages. Load resistors help simulate the original bulb’s load to prevent these issues.
Q2: Can I install LED tail lights without a resistor?
Technically yes, but you may experience flashing problems or malfunction indicators. For proper function, resistors are recommended when upgrading to LED.
Q3: Where is the safest place to mount a load resistor?
Load resistors should be mounted on a metal surface away from plastic or enclosed areas, as they can get hot during operation.
Q4: Will this modification affect my Corvette’s electrical warranty?
Since the 1992 Corvette is a classic, most warranties are likely expired. However, always use proper installation methods to avoid damaging any electrical components.
Q5: How long do LED tail lights and resistors typically last?
Quality LED lights can last over 50,000 hours. Load resistors, if mounted correctly, can also last several years without issues.